
In the May Wired column, Malcolm introduced us to the ins and outs of obtaining a domain name, something I finally got around to doing myself. We will continue this theme in next month's issue, explaining how to set up domain names and virtual hosts using your own computer rather than a hosted service. This month though, we will wrap up the March 2004 Wired column on accessing data. We left off with the database manager phpMyAdmin.
Create Your Database
If you were able to see the phpMyAdmin window with your browser pointed at http://localhost/phpMyAdmin/, you probably had little trouble creating a new database. Note that you may have to enter: 127.0.0.1 rather than localhost depending on your browser's proxy settings.
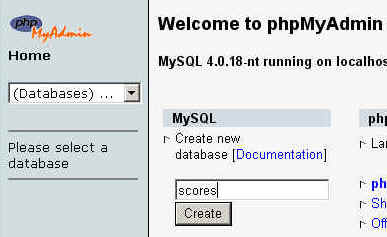
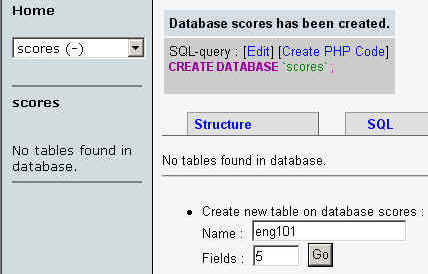
After creating a database called scores, it will show up in the list of databases on the drop down menu in the left column. Select the scores database and a window will appear prompting you to create a new table. Enter eng101 for the table name and 5 for the number of fields, then click Go.
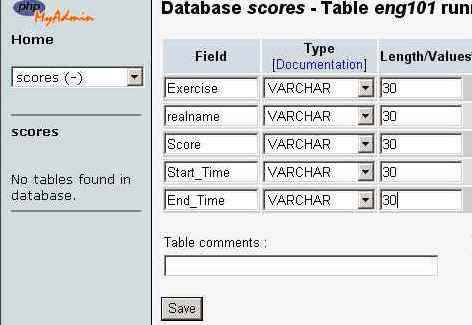
Enter the five field names: "Exercise," "realname," "Score," "Start_Time," and "End_Time." Be careful as the field names are case-sensitive. To keep our first lesson simple, we will enter everything into the database as text. Therefore, choose VARCHAR for the type of data and 30 for the maximum length of your data. The VARCHAR column can be any length from 0 to 255. Check dev.mysql.com for more details on field types. Next, click Save. Now that the database is complete, let's move on to making a quiz with Hot Potatoes web.uvic.ca/hrd/halfbaked/.
Create Your Hot Potatoes Quiz
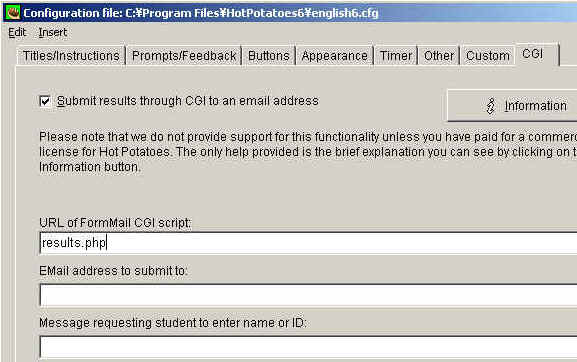
I am assuming that you have some experience creating quizzes using Hot Potatoes. After you make a quiz, choose Options and Configure Output from the quiz menu.
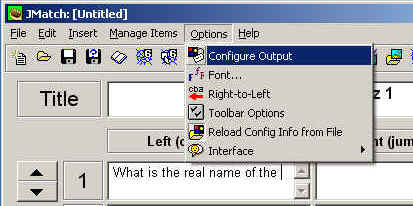
Next, enter results.php for the URL of the FormMail CGI script. We have not yet made the file results.php, but you will later save results.php into the same directory as your .html quiz page. You do not need to enter an email address. Save the settings and export your quiz as quiz.html.
You may want to refer back to the March 2004 Wired column where we walked through the steps of setting up Apache and MySQL on your computer. For Windows users, save your .html quizzes to: C:\AppServ\www\. Mac OS X users will save to: /Library/WebServer/Documents/. Place any files that you want to make accessible via the Internet in these directories.
Write the PHP Script
Next, we need to create a simple text script that delivers the data from the .html quiz to the scores database. Note that in the following script, the comments after the double slashes are not necessary for the script to run. Open your favorite text editor and enter the following text:
<?php
// Connect to the local database using username root and no password.
mysql_connect ("localhost", "root", "");
// Select our database named scores.
mysql_select_db (scores);
// insert our 5 fields into the table eng101
mysql_query ("insert into eng101
(
realname,
Exercise,
Score,
Start_Time,
End_Time
)
VALUES
(
'$realname',
'$Exercise',
'$Score',
'$Start_Time'
, '$End_Time'
)
");
//Provide some feedback to the student.
echo ("Your answers have been saved!");
?>
Save this file as results.php into the same folder as your quiz.html file. Be sure you save it as unformatted text using Notepad rather than WordPad. Right click on the results.php file and choose properties (Windows users) or Get Info (Mac users) to check that the file name appears as results.php and not results.php.txt.
Test Your Quiz
Open your web browser and type in the URL http://localhost/quiz.html. You should get a prompt to enter your name. Take your quiz and submit the results. You should see a window saying: "Your answers have been saved." With the simple script we wrote above, there is no way to check that the data was actually saved to the database unless we check it. Direct your web browser back to: http://localhost/phpMyAdmin/, choose the scores database from the left menu and then click on the small icon that looks like a table to the left of the eng101 table link. If all went well, your data should appear in the table. If you don't see any data, don't give up. As I was going through these steps on my own computer, I made several mistakes before I got it right. Troubleshoot by backing up to the beginning and check each step carefully. If you are still having problems, please feel free to send the Wired column editors an email along with a detailed description of your problem.
Important Note!
The setup of MySQL and phpMyAdmin are NOT password protected with the default installation. If you are going to be using MySQL and phpMyAdmin on a web server that anyone has access to, you should set a root password for MySQL http://dev.mysql.com/doc/refman/5.7/en/tutorial.html and password protect the phpMyAdmin folder using a .htaccess file www.apacheweek.com/features/userauth.

